Here is a very short tutorial on how you can set your photoshop to produce Divs and CSS rather than the old fashion tables. This is very useful becuase this is becoming the new way to work with web pages and lets you add a lot more room to do stuff that wouldnt be possible with non expandable tables.

ok once you have a document sliced and everything and you optimized all the images when you goto the “Save for web option”
http://img384.imageshack.us/img384/1…rwebbx1.th.png

you will notice a little arrow next to your presets and on the border of the box with the image options
http://img384.imageshack.us/img384/77/arrowvo3.png
click that box and select “Edit Output Settings” from the drop down menu.

This will open up the “Output Settings” dialog box. In here on the “HTML” settings page you want to:
Select the Output XHTML box
Set tags case to: lowercase(body)
Set attribute case to: lowercase(rowspan)
and you can pretty much leave everything else default.

Then from the drop down menu where it says “HTML” select “Slices”. All you need to do here is change the “Slice Output” setting to Generate CSS and from the drop down menu select By ID.

And finally you want to save the profile so click the save button and save it to whatever you want. Just remember when you click save on the “Save For Web” dialog you need to change the settings in the save dialog to whatever you saved it as. I just saved it as default because I always use it.

Now you have a fully functional Div and Css layout and you are no longer stuck with the limits of tables.

Source: mikeandike22 @ http://www.daniweb.com/news/post971506.html#

No doubt you’ve heard about image slicing, but do you know what it is and how it works? Image slicing is a technique for creating a web page (or a component of a web page, like a header or navigation menu) visually in Photoshop (Fireworks and Illustrator also allow you to slice images, too). But how does it work?

Well, you’d first design a page in Photoshop exactly as you want it to look when it goes live on the web. Then you cut out all the page components – title bars, buttons, navigation menus, and so on – using Photoshop’s Slice tool. Then, when you save everything out, Photoshop saves each slice as an individual graphic, and (and this is the icing on the cake for the code-leary) all the necessary code will automatically be written as well. Sounds awesome, huh?

Finally, once everything’s saved out, you can pull everything into Dreamweaver and finish off your layouts with any necessary tweaks. It’s a very cool process, and one of the most popular methods for building web pages.

The following sections describe how to take a created layout, slice it up in Photoshop, save it out, and then pull the whole thing into Dreamweaver to finish it off. Ready? Lets get started!

Part 1: Designing Your Page & Slicin’ it Up

So obviously, the first thing you’ll need to do is create a layout in Photoshop. In my example, I’m building an entire page, and because I don’t want any horizontal scrolling in my layout, I build for the most common monitor resolution, 1024×768. There’s quite a bit of debate as to how wide one can design inside a width of 1024 pixels, but I personally go with 990 pixels as my maximum width. This means that starting off in Photoshop, I create a new file with a canvas size of 990 pixels wide. As for the height, that’s usually determined by content, so you might want to give yourself lots of space to work inside.

Now in the case of creating a page object like a menu or header, you’d have to know the dimensions of the object before creating it in Photoshop.

Once your dimensions are set, it’s simply a matter of building your design. Design and lay out all your buttons, background graphics, logos, and so on, building up your page’s design. Use whatever tools, commands, and options you’d like. Often times, I’ll even cook things up in Illustrator, then drop them into my layered Photoshop layout as Smart Objects, just to make the process go faster.

If you’re building a page as I am here, don’t worry about actual page content – the text and other objects that would appear on the individual pages of your site. Imagine instead that you’re building a template. What you’re after is the overall look of all the pages in your site. Later on in Dreamweaver, you can drop in the content. Once your page design is complete, you’re ready to begin slicing it apart.

Image Slicing in Photoshop CS3 image 1

Slicing up your design is the fun part. What you’re doing is taking your overall layout and cutting it into smaller pieces. This means you’ll be isolating buttons, logos, and background areas on your page by slicing them away from the rest of the layout. There are a few different ways to slice apart layouts and page components, but I’ll show you my technique.

Here’s how to get started:
1. From Photoshop’s Toolbox, select the Slice tool.
2. With the Slice tool, click and drag a box all the way around your entire design.

This creates a single, large slice that encompasses your entire layout. I think you’ll find this to be the easiest and most accurate way to slice images.

Image Slicing in Photoshop CS3 image 2

3. Right-click (or Ctrl+click on the Mac) anywhere inside your design, and choose Divide Slice.

4. In the Divide Slice dialog that appears, decide how you’d like to break that single slice that you just drew. Turn on either Divide Horizontally Into or Divide Vertically Into (or both); then enter in the number of slices you’d like to create. Click OK when you’re ready.

This is where the craft of image slicing comes in. Look for natural breaks in your image. Remember, each slice will wind up being saved out as an individual graphic, so you may want to create slices for each button in a menu, for example. In my layout, I’ve divided the image into three slices horizontally: one for the header area, one for the main area, and a third for the lower, footer area.

If Preview is turned on in the Divide Slice dialog, you’ll be able to see where your slice lines will appear in the image. Don’t worry if they’re not exact, we’ll adjust them in the next step.

5. Next, if needed, adjust the slice lines that appear on your image simply by dragging on them. You may want to zoom in for a little more precision.

You’re now ready to continue slicing apart your layout. I find it easiest to work from the general to the specific – in other words, look for main areas to slice away; then start getting more refined as you go. Once you have the general areas of your layout sliced, you’re ready for the more detailed areas.

6. To continue slicing apart your image, single-click inside a “general area” slice; then right-click (or Ctrl+click on the Mac), and choose Divide Slice once again.

Notice that when you single-clicked inside the slice, all the other slices in the image deselected? Now this time, you’ll only be dividing up the currently selected slice.

7. In the Divide Slice dialog, set the number of slices you’d like to create horizontally and vertically, just you did earlier.

As before, look for natural breaks in your layout. Remember, each slice is saved as a separate graphic, so you might want to isolate buttons, logos, and so on. Don’t get frustrated if you have to start over a few times. Image slicing does takes a bit of patience. Knowing where and what to slice is just a matter of practice.

8. Continue slicing apart your layout using the techniques described until you’re happy with how things are looking.

Image Slicing in Photoshop CS3 image 3

Things lookin’ good? Great, now you’re ready for the fun part!

Part 2: Savin’ Er Out

Once you’ve sliced up your layout, you’re ready to save everything out of Photoshop. And remember, not only will Photoshop save all your sliced images in one shot (meaning that you don’t have to save each of them individually), but it’s also going to build your page’s underlying code structure for you. So when you save your slices, Photoshop will also save an additional HTML file. That’s the file that you’ll want to open in Dreamweaver. Awesome is an understatement here, folks – it doesn’t get much sweeter than this!

Here’s how to save it all out:
1. Choose File > Save For Web & Devices.
2. In the Save For Web & Devices dialog, set optimization settings for your slices.

If you’ve never used this dialog before, I’ll give you a quick run-through on how it works. Holding down Shift, you can select the slices that you’d like to set certain optimization settings for – that is, compression options when you’re saving an image (or in this case, a group of images) for use on the web. Next, on the right side of the panel, you can set your optimization settings.

Depending on the file format that you choose, different options will appear. For example, in the case of JPG, you’ll see options for compression, quality, blur, matte, and a few others. Unfortunately, we don’t have the space to go through all the options, so you may want to read up on a few of these.

Image Slicing in Photoshop CS3 image 4

3. Once you’ve optimized your slices, click Save.

4. In the Save Optimized As dialog, name your file in the Save As field; then navigate to the folder where you’d like to save your slices. Don’t click Save just yet.

The location where you save your work will most likely be your site’s local root folder, as you’ve defined it in Dreamweaver (You may need to read up on defining a site in Dreamweaver if you’re not sure what I’m referring to).

5. From the Format menu at the bottom of the dialog, choose HTML And Images.

This ensures that Photoshop will not only save out your slices, but also all the background code needed to render your layout.
If you’d like to explore some of the other options available, choose Other from the Settings menu. You may want to experiment with a few of the commands found here.

6. When you’re ready, click OK.

Photoshop saves out all your slices, and the HTML needed for your layout. Pretty easy stuff. Now lets go take a look at what happened.

7. Minimize Photoshop; then navigate to the folder where you saved your work.

Notice that Photoshop created an HTML file, as well as an images subfolder. Inside the subfolder, you’ll find all the individual slices from your layout.

8. To see your completed layout, open the HTML file in your web browser.

Your layout looks exactly as it did back in Photoshop. Cool!

Part 3: Throwin’ In Some Dreamweaver

Now that everything is saved out of Photoshop, Dreamweaver takes over the formatting duties. In Dreamweaver, try opening the HTML file that Photoshop created, and you’ll see right away that everything’s been created with tables. In Photoshop’s Save Settings (Step 5 in the previous section), you can set whether to use tables or div tags.

Notice too that all the slices sit within the table’s cells. You can drop additional page content on top of your images using a clever technique: Remove the slice from the table cell; then set the cell to the slice’s original dimensions; drop the slice into the cell’s background; and finally insert new text or image content into the cell. This creates the illusion of the content floating above the graphic, as you can see in the screen shot.

Image Slicing in Photoshop CS3 image 5

Now you can begin making any adjustments you’d like. For example, you could center the layout, add in a background color, create any necessary CSS rules, begin dropping in your content, and set your hyperlinks.

From here, it’s all tweaking – adjusting CSS styles, text, and other page elements within your design. If you want a graphic to appear behind the text in a table cell (which you can see was done in the sample page design, which uses a crater background behind the text), remove a graphic from its table cell and set it as the cell’s background image, just as you did earlier in this chapter. Then insert your text in the cell as you normally would.

As you work, don’t forget to preview your page to see how your design is looking. And here’s one more trick: With your page working well in Dreamweaver and previewing nicely in those target browsers, use it as the basis for the other pages in your site by resaving it under a different file name for each page. Even better, you can use your page as a Dreamweaver template.

So there it is, a quick guide to getting started with image slicing in Photoshop. Experiment and try out some of the different options, and most importantly, have lots of fun!

Fitur-fitur Mikrotik
Instalasi Mikrotik RouterOS
Konfigurasi Awal mikrotik
Bandwidth Manajemen Menggunakan simple queue
Pisah Bandwidth IIX dan IX
Hotspot Manajemen with Mikrotik RouterOS 2.9.27
setting usermanager
Setting PPTP
Script DOTA
Load Balancing
Load balancing II
Script DOTA lagi :D
Bandwidth Management & ARP
EoIP
Script Limiter Domain
Membuat Server Gateway/Router dengan Mikrotik
Routing Mark
Mikrotik Sebagai VPN Server
Cara Backup settingan MikroTik
Tips Menangkal NetCut
---
Source: uye @ http://www.kaskus.us/showthread.php?t=1130597

Lakukan langkah-langkah berikut :

* Klik kanan pada My computer

* Pilih Properties

* Lalu ke HARDWARE tab->Device manager

* Pilih Ports ->Communication Port(double click on it and Open)

* Lalu Ke Port Setting dan buat beberapa perubahan:

* Pada “Bits per second” ganti menjadi 128000

* dan “Flow control” option ganti menjadi Hardware

* Apply dan lihat hasilnya.

Quote:

CONTOH

Source: genuk @ http://www.kaskus.us/showthread.php?t=3105435

Do you remember those moments when you forgot your deepfreeze password and for some reason, you have the need to take it off from your PC. Here I will show you 2 methods that I found in the Internet. I myself proved the first method works very well.

Method 1

How to Uninstall Deep Freeze 6.0 Without Password

[Unfortunately up to this article is written, there is no ]Smart Software for Deep Freeze v.6 [that is capable ]to disable or uninstall [Deep Freeze v.6] this software in this time there is no. But with little tricks, Deep Freeze 6.0 can be disable or unintal not requiring password. following way to disable or unintal Deep Freeze ver 6 :

  1. Booting Computer From CD use Windows XP Installer
  2. After coming up with part to Enter Setup, Press Enter then F8 and await some moment
  3. then selected R to repair Windows ( Repair Setup)
  4. Hereinafter continue Install windows untill finish.
  5. Now prepare the Deepfreeze v.6 of and double click
  6. will appear “Uninstall Deepfreeze” windows and process uninstall till finish.
  7. Done……

In this time i still not known more effective way to remove DeepFreeze 6.0. if there is a way of more effective please share here… :D

Source: http://tricks-collections.com/

Method 2

By cyberlog
Published: December 19, 2008
Updated: December 19, 2008
Print
Level : Pemula ( Nyubie )
Author : adi.aka.Cyberlog
Refensi : Uncle Google
Contact : cpanel_hacking@yahoo.com
**********************************
Terpaksa buat artikel untuk kill deepfrezena Wk 6.20 hehe di net punya kawan, habis lupa pass untuk generate Wk client ( Server kena petir, HD mate, kontrol Deep dari sana semua )

Deepfreeze adalah suatu peranti lunak yang mampu mengorganisir system computer dengan cara membekukan struktur sistem dan direktori-direktori penting milik Administrator, sehingga dengan sekali restart , apapun perubahan yang sudah terjadi di dalam sistem akan dikembalikan ke bentuk semula.

Backtrack 3adalah salah satu distro linux yang di khususkan untuk penetrasi di security test.

Batasan Masalah

Untuk kesempatan kali ini hanya di batasi pada penggunaan Backtrack 3 sebagai media awal untuk meng-uninstall deepfreeze 6.20. sebagai mana di ketahui penulis bahwa untuk menguninstall deepfreeze 6.xx belum tersedia unfreez-nya.

Requirements

1. CD/USB flashdisc sebagai media boot
2. file $persi0.sys yang anda dapat download di http://www.megaupload.com/?d=9BW298L9
3. backtrack #3 yang anda dapat download di http://www.remote-exploit.org/backtrack_download.html
4. Deepfreeze workstation

Langkah-langkah uninstall deepfreeze

Sekalian belajar distro linux yang satu ini, maka penulis berinisiatif menggunakan backtrack #3,

1. Extract file backtack yang telah di download ke dalam USB Flashdisc/ Burning image ke CD file backtrack yang telah di download.
2. Copy file $peris0.sys ke USB Flashdisc.
3. restart komputer anda, kemudian setting bios agar boot dari CD/DVD. Bila menggunakan CD/DVD, setinng boot dari USB apa bila anda menggunakan USB sebagai media boot.

Setelah bios anda di set boot dari CD/USB kemudian tekan F10 simpan semua perubahan, dan computer mulai boot dari usb dan alhasil maka anda akan di bawa ke menu pilihan, kali ini penulis menggunakan menu BT3 text mode frame buffer, apa bila anda di minta memasukan user dan password, isikan dengan user dan password default dari backtrack yaitu user=”root” dan password=”toor”.

Sekarag anda login sebagi root, kemuadian ketik startx .
Dan anda akan di bawa ke tampilan KDE dari BT3 nan indah ini, atau tampak seperti gambar di bawah ini :

Double click pada icon sytem pada desktop, dan akan di tampilkan semua media storage yang terdapat computer kita.
Karena target kita adalah C:/system yang ada di windows, maka double click pada media storage system.
Copy file $persi0.sys yang telah di download ke drive partisi windows C:/ atau tampak seperti gambar di bawah ini :

Langkah berikutnya adalah restart computer anda, setting bios kembali agar booting dari hardisc. Setelah anda masuk ke windows. Ini dia saat yang di tunggu-tunggu, “saatnya membasmi deepfreeze yang bandelnya amit!! Wakk akka.. “.
Untuk menguninstall deepfreeze jalankan file deepfreeze workstation maka akan tampak tampilan sbb :

Pilih Uninstall untuk mengunsinstall deepfreeze dan pilih exit untuk keluar.
Karena tujuan kita untuk men-uninstall deepfreeze maka kita pilih uninstall.
Lalu anda akan di bawa ke tampilan seperti di bawah ini:

Pilih ok to uninstall dan kemudian click finish. Just few second bro… your computer will be reboot 
setelah computer reboot itu adalah akhir perjalanan dari langkah demi langkah menguninstall deepfreeze.
Setelah computer anda reboot anda dapat memeriksa apakah uninstall berhasil atau tidak dengan menekan Ctrl+Alt+Shift+F6 maka hasilnya apa?
Nihil kan….
Artinya uninstall berjalan dengan sukses. Akhir kata selamat mencoba …

Note :
Bisa diterapkan di versi workstation 6.xx, single 6.xx
Pergunakan dengan Bijak, Disarankan tidak untuk menjahilin net orang
Dont change My article, free for distr.

Creditz :
Allah yang memberi hidup dan Matiku,
My parents & Familys
My Wife erni.Hasibuan
Member sekuritionline ( Irc / Forum )
Staff Sekuritionline ( We Different / Underground )
IRC all Channel

Zero Creditz :
Buat Koruptor ( mate aja Loe )
Peg. Negri ( Huh gimana negara mau maju wong pegawainya aja masuk jam 10 pulang jam 2, pantes aja Negara ku tercinta ini makin terpuruk, SDM-na ga pernah dibenahi, dikit2 Money )

Important Message :
diatas awan masih ada langit

Source: http://www.sekuritionline.net/

Kaspersky Anti-Virus 2009 memang berbeda dengan versi sebelumnya, baik itu yang versi 5.0, 6.0 maupun 7.0. Kaspersky 2009 ini tidak menyediakan fasilitas atau layanan untuk update manual. Dengan kata lain updatenya memang diwajibkan untuk koneksi langsung ke internet.

Tapi sebenarnya Kaspersky sendiri telah menyediakan tools khusus untuk melakukan update secara manual yaitu Kaspersky Updater. Tools ini bisa digunakan untuk download update semua produk Kaspersky.  Adapun langkah-langkahnya sebagai berikut :
  1. Silahkan download dua file berikut ini : Update For Windows dan gui for wind updater
  2. Setelah selesai segara extract kedua file tersebut dan tempatkan dalam satu folder. Selanjutnya jalankan file KasperskyUpdater.EXE untuk download update sesuai dengan versi Kaspersky Anda.
  3. Bila sudah selesai maka klik Apply kemudian START dan tunggu sampai proses download update selesai.

Bagaimana Proses Updatenya ?

Ketika menjalankan updater ini, maka akan terdapat dua buah folder Temp dan Updates di bawah folder yang berisi file KasperskyUpdater.exe tersebut. Folder Temp berisi file-file update sementara dan untuk sepertinya juga untuk membandingkan dengan update yang ada di server Kaspersky. Sedangkan folder Updates berisi File-file update yang sudah siap digunakan untuk meng-update kaspersky

Jika proses download update sudah selesai, kita tinggal mengatur setting di Kaspersky agar proses update tidak dilakukan online, tetapi dari folder Updates diatas. Caranya sebagai berikut :

  1. Klik kanan Icon Kaspersky yang ada di systray windows ( pojok kanan bawah), pilih menu Settings
  2. Pilih menu Update dan klik Settings…
  3. Klik menu + Add dan cari lokasi folder yang berisi file-file update diatas ( folder Updates hasil download diatas)
  4. setelah ditambahkan, hilangkan tanda check untuk “Kaspersky Lab’s Update server” dan klik OK.
  5. Proses selesai, untuk mengupdate, tinggal klik kanan icon Kaspersky dan pilih menu Update. Atau dari menu Utama, pilih Update dan klik Start Update

Jika kita ingin mengambil update di warnet atau komputer lain, jangan lupa menyertakan file-file di folder Temp (dan folder ini jangan dihapus), sehingga proses update bisa berjalan cepat. Untuk folder Updates, seharusnya juga bisa digunakan untuk mengupdate Kaspersky di Komputer lainnya.

Sumber informasi :

Postingan di atas ditulis setelah saya membaca dan merenungkan petunjuk di http://ebsoft.web.id/2008/12/31/tips-update-offline-manual-kaspersky/

relayed: http://www.d60pc.com

Terimakasih atas ilmu yang dibagikan semoga bermanfaat buat kita semua.

Update Posting Terbaru :

Ada beberapa rekan kita mengalami kegagalan download update Kaspersky dengan kode 19 : Process Canceled By User. Hal tersebut terjadi karena ada file system libraries VCRT8 yang kurang. Oleh karena itu bagi Anda yang mengalami masalah tersebut maka Anda silahkan download file system tersebut pada link di bawah ini :

http://data2.kaspersky.com:8080/updater/Microsoft.VC80.CRT.zip

Kemudian extract dan tempatkan semua filenya bersama dalam folder yang sama dengan program update di atas.

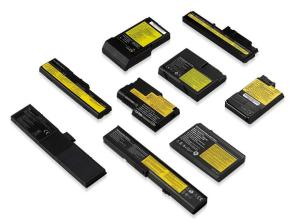
Beberapa fakta yang saya temuin ttg baterai laptop sebagai pemakai laptop dari orok.

Banyak orang menganggap kalau menancapkan charger terus2san saat memakai laptop dengan kondisi baterai terpsang adalah oke2 saja, karena laptop ada sirkuit proteksi yang otomatis memutuskan listrik saat baterai sudah penuh. Namun ternyata tidak sesimple itu, ini adalah alasannya.

1. Musuh utama dari baterai lithium adalah overcharge. Meskipun di laptop2 sekarang ada intelligent circuitnya yang stop charging setelah baterai penuh, namun saat baterai sudah berkurang lagi (karena sambil dipakai) akan otomatis charge lagi hingga penuh lagi, dan akan berulang. Masalahnya, sebenarnya setelah penuh dia ga akan langsung putus, namun msh ada waktu beberapa detik hingga menit sebelum sirkuitnya benar2 bekerja untuk memutuskan aliran charging. Nah pada saat inilah overcharge terjadi.

Jika ini diulang2 (karena laptop agan nyolok terus, dipastikan Baterai akan drop dengan cepat)

2. Musuh kedua lithium adalah life cycle. Baterai lithium mempunyai life cycle tertentu dimana tiap kali charge kapasitasnya akan semakin berkurang.

Saat sirkuit pemutus charge otomatis bekerja (memutuskan aliran listrik charge karena udah penuh, lalu otomatis mengisi lagi saat baterai udah tidak full), Mengisi baterai dari 99% ke 100% itu dianggapnya sama saja dengan mengisi dari 1% ke 100% atau 20% ke 80%, Jadi disini intelligent charging circuit malah jadi bumerang, karena akan mengurangi sisa life cycle baterai.

3. Saat baterai di charge dan di pakai secara bersamaan, panas yang dikeluarkan akan lebih besar karena ada 2 buah kondisi proses energi.

Panas yang dihasilkan bisa hampir ga kerasa sampai kerasa banget tergantung tipe laptop, padahal kita tahu panas berlebih adalah salah satu musuh utama dari perangkat elektronik…

Memakai laptop dengan memasang baterai dan charger secara bersamaan dan terus menerus, dipastikan 1/2 tahun saja kapasitas baterai anda akan drop bisa cuman sisa tinggal 1/2 nya saja dari kapasitas awal. Dan ga sampai setahun baterai anda cuman bisa ksh listrik 5-10 menit sebelum laptop padam.

Memang baterai lithium. Walaupun ga dipakai, setiap tahun kapasitasnya akan drop dengan sendiri kurang lebih 25% dari kapasitas awal saat dia dibikin (normalnya memang kayak gini gan), namun ada cara2 agar baterai laptop awet dipakai hingga 2 bahkan 4 tahun, dengan catatan kapasitasnya pasti berkurang, namun masih layak dipakai.

Cara pemakaian baterai laptop yang benar.

1. Cara kompromi : Charge baterai hingga 95%an (ga perlu 100%), pakai hingga baterai mau habis 5-10% tergantung tipe laptop, ada laptop yang 15% uda sekarat (laptop yang besar dan haus daya) ada juga yang 5% msh santai (netbook). Baru colok lagi charger sambil dipakai. Inget kalau udah mau penuh (95%an) lepas charge ulangin lagi.

2. Cara sedikit repot: Sama kayak diatas, cuman pas mau charger, laptop standby/matiin/jangan dipakai, pas udah ijo/full copot charger. Disini inteligent circuitnya biasanya bekerjanya bener, jadi ga terjadi disconnet dan charge yang berulang (karena sambil dipakai) yang menyebabkan penurunan umur baterai.

3. Cara repot. Matiin laptop, charge ampe ijo, lepas charger, lepas baterai lalu simpen di tas. Pake laptop via UPS biar aman. Pas lagi travel baru dipasang lagi tuh baterai. Cara ini ga bisa dipakai untuk laptop dengan tipe baterai yang built in (contoh: MACBOOK UNIBODY)

Test drive.
Dengan laptop baru, metode 1 umur baterai setelah 2 tahun kurang lebih capacity dari kondisi awal msh 30-40%.
Metode 2 msh sisa 40-60%
Metode 3 msh sisa 50-70%

Segitu aja masukan dari ane.
Semoga baterai awet.

Sumber: http://my.opera.com

Pic: http://www.made-in-china.com

Is your system unable to boot into Windows XP/2000 or even Safe Mode? Whether you get a blue screen or XP/2000 just hangs, then this information is for you. This will allow you to repair your Windows XP/2000 installation (hopefully) without having to losing your data or settings.

Indications:

  • May allow Windows to load properly if there are critical driver, software or registry problems which have rendered the system unbootable. (Blue screens, hanging, errors etc..)
  • May repair/reinstall missing Windows components or solve otherwise quirky behavior
  • May allow drive to be installed on another system or motherboard with different chipset
  • May allow you to install new motherboards or make other large hardware changes that XP may not readily accept with PnP.

Note: The system repair function will remove any updates you have previously installed that are not included on the CD. Drivers will also be reverted to their original XP versions, as well as some settings (Including by not limited to network & performance settings). It may be necessary to reactivate your Windows XP

as well.

Step 1: Determine the problem

  • First, figure out what CAUSED the problem. Often times, when Windows is rendered unbootable, there is a good reason. This can often be due to hardware failure (bad hard disk, memory or CPU for example). In these cases, the system repair function will not work. System repair will only repair your software.I strongly recommend you run a disk utility on your hard drive before performing a system repair. You can find more information about disk utilities here:
    http://www.techspot.com/vb/showthrea…&threadid=7602

    Memory can also cause these problems. A good memory test can be found here: http://www.memtest.org

Step 2: Begin the repair process

  • You must boot from your XP or 2000 CD. Please make sure it is the same version of Windows that is currently installed on your computer (ex. XP Home cannot repair XP Professional). Place the CD in your CDROM and start your computer. Newer versions will work as well (ie. Windows XP Pro SP2 CD will work on an older WinXP Pro SP1 installation)Before the Windows logo appears, you will be asked to press any key to boot from CD, so do just that.

    If you are unable to boot from the XP/2000 CD, then please check the last step in this short guide.

Step 3: System repair steps

  • A blue screen will appear and will begin loading XP setup from the CD.RAID/SCSI/Unsupported UDMA users:
    You will be prompted to “press F6 to install any third party SCSI or RAID drivers”. Most users will not have to press F6, but if you are running RAID, SCSI or unsupported ATA controllers, then you need your controller drivers on a floppy disk. If you are unsure whether you have RAID/SCSI, then simply let the CD load without pressing F6.

    Once completed, you will be confronted with “Windows Setup”. You will be asked to setup up Windows, or repair Windows with the recovery console. Choose the FIRST option, NOT recovery console.

Choose F8 to continue.

  • Next, Windows Setup will find existing Windows XP/2000 installations. You will be asked to repair an existing XP installation or install a fresh copy of Windows XP/2000.If no installations are found, then you will not be given the option to repair. This may happen if the data or partition on your drive is too corrupted.

  • That should be it. Windows XP/2000 will appear to be installing itself for the first time, but it will retain all of your data and settings. Just follow the prompts, have your CD-KEY handy and hope for the best!
CDROM NOT BOOTABLE: If the XP/2000 CD does not boot…


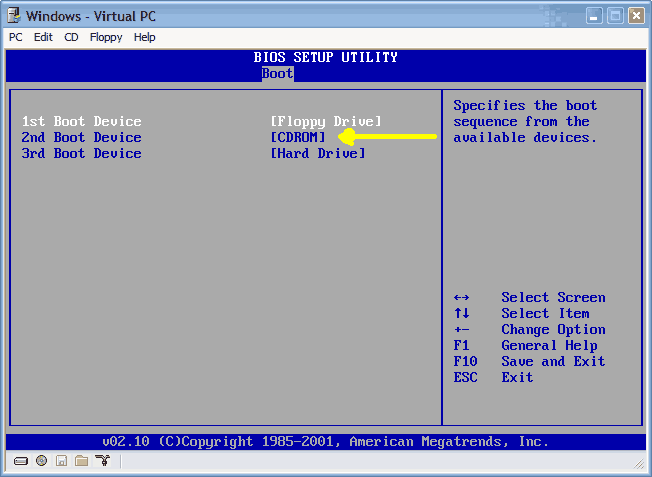
  • Many computers out there are not configured to boot from the CDROM. If you cannot boot from the CDROM, this is probably due to the boot order of your computer being incorrect for CDROM booting.You have two options:

    1.) You can change this in the BIOS during POST, which is usually the very first screen displayed by your computer when you turn it on.

    2.) Many newer computers have a selectable boot menu by tapping F8, F10 OR F12 right during/after the first POST screen. This will allow you to temporarily boot from a CDROM.

    To enter your BIOS, most users here will press the DEL key.

    Most users with Dell, Gateway, Sony & HP systems will press F2.

    Many Toshiba laptops are F2 or require you hold the ESC key when you turn the system on. Your notebook will report an error and prompt to press F1 to enter setup. Do exactly that.

    Compaq users will usually have to press F10.

    IBM typically uses F1 or F2.

    Other brands may have different keys to press to enter setup, but F1, F2, Del, Tab and CTRL+S or CTRL + ALT + S are the most common ones I’m familiar with. Often, the BIOS will display what button to press to “enter setup” during POST.

When you enter the BIOS setup, you need to change the boot order. The CDROM should be setup before the Hard Drive. Each BIOS is different, but here is an example:

Source: http://www.techspot.com/

When you have more than 1 ISP to provide your internet services, you need to use a good load balance so that you can enjoy the full benefit of having them. Below are some of the best practices in utilizing multi ISP lines. [translated to Bahasa Indonesia]

logo_mikrotikMikrotik:

menggabungkan dua atau lebih ISP Internet
Pengalaman saya pake mikrotik :
ISP-A gateway 10.0.0.1 bandwidth 2Mbps
ISP-B gateway 10.1.1.1 bandwidth 4Mbps

dengan menggunakan Static Equal Cost Multi-Path routing :
setelah memasukan ip pada masing interface tinggal masukan gateway
/ip route add gateway=10.0.0.1,10.1.1.1,10.

1.1.1otomatis
akan membagi dengan sendirinya sesuai load/beban yang tersisa,
perhatikan bahwa gw 10.1.1.1 ditulis 2x karena dia memiliki bw 2x lebih
lebar


mudah bukan

Jika
anda mempunyai 2 network lokal dengan 2 ISP seperti diatas, hanya saja
ingin di buat network-1 melalui ISP-A dan network-2 melalui ISP B, maka
yg anda lakukan sbb :
misal :
net-1 : 192.168.0.0/24
net-2 : 192.168.1.0/24
isp-A gw 10.0.0.1
isp-B gw 10.1.1.1

isikan ip pada masing2 interface, kemudian :

/ip firewall mangle add src-address=192.168.0.0/24 action=mark-routing new-routing-mark=net1 chain=prerouting
/ip firewall mangle add src-address=192.168.1.0/24 action=mark-routing new-routing-mark=net2 chain=prerouting

/ip route add gateway=10.0.0.1 routing-mark=net1
/ip route add gateway=10.1.1.1 routing-mark=net2

penjelasan :
beri
tanda pada lalu lintas data dari network tersebut (misal 192.168.0.0/24
== net1) dan lewatkan pada gateway tertentu (misal 10.0.0.1 untuk net1)

Intinya sama saja jika kita menggunakan linuxbox menggunakan iptables/pf atau apapun

Sumber: itcenter@yahoogroups.com
Sumber Gambar: landashop.com

Tiga cara install XP pada notebook yang menggunakan SATA HDD.

windows_xp_logoDikarenakan Type Harddisk Notebook saat ini sudah mempergunakan SATA dan masih banyaknya user yang memilih Operating System Windows XP, sedangkan Windows XP sendiri belum bisa mengenali Harddisk SATA tersebut secara langsung maka seringkali user/customer mengatakan Harddisk tersebut rusak atau tidak dikenali pada saat instlasi Windows.
Tapi sebenarnya Harddisk tersebut tidak rusak hanya kita perlu menginstall driver Harddisk SATA pada saat awal instalasi Windows XP tersebut atau kita bisa men-disable feature SATA pada laptop tersebut apabila BIOSnya mendukung.

Berikut cara instalasi laptop dengan Harddisk Type SATA dengan 2 cara yaitu :
I.  Men “DISABLE” SATA NATIVE SUPPORT
Hal ini dilakukan apabila “BIOS” pada Notebook/Laptop tersebut mendukung untuk melakukan DISABLE SATA NATIVE SUPPORT, yaitu dgn cara sebagai berikut:
1. Masuk Menu BIOS (Tekan F10 – segera setelah tampilan COMPAQ muncul, untuk Notebook Compaq)
2. pilih Menu System Configuration
3. pilih SATA NATIVE SUPPORT
4. Rubah menjadi DISABLE
5. Save perubahan dan keluar dari Menu BIOS
6. Setelah Restart lakukan instalasi Windows XP

II. Instalasi menggunakan “External DiskDrive/Floppy Drive”

Apabila BIOS pada NoteBook/Laptop tersebut tidak ditemukan menu untuk mendisable SATA NATIVE SUPPORT (seperti pada langkah I diatas) maka Instlasi Windows XP harus dilakukan dengan mempergunakan External Floppy DiskDrive.
Pada cara ini anda mutlak memerlukan satu buah komputer yang dilengkapi dengan Floppy Disk Drive dan sebuah Disket Kosong yang berfungsi untuk meng-ekstract file driver SATA. Floppy drive ini bisa juga berupa sebuah External USB Floppy Disk Drive.
Caranya copykan / extract file driver SATA ke floppy disk / disket.
Kemudian lakukan instalasi seperti biasa, ketika muncul pesan “Press F6 to Install a Third Party Driver”, tekan F6 dan ketika diminta drivernya, arahkan ke External USB Floppy drive. Pilih driver yang sesuai. Kemudian lanjutkan instalasi Windows XP seperti biasa.

Khusus Notebook Compaq Presario, bisa lakukan langkah-langkah sbb:
1.  Buka CD Driver (copy) yang disertakan pada Komputer (Notebook / PC) yang telah ada Operating Systemnya dan memiliki DiskDrive
2.  Explore CD Driver (di komputer yg ada DiskDrivenya)
3.  Masuk/Pilih Direktori \Umum\HDD SATA
4.  Pilih Direktori HDD965/HDD 945 sesuai dgn spesifikasi Notebook
mis: – Notebook Pressario 3430/3422 — Chipset i945 pilih Direktori 945
– Notebook Pressario 3535/3504 — Chipset i965 pilih Direktori 965
5.  Jalankan file yg ada di dalam Direktori tersebut (akan minta disket)
6.  Masukkkan Disket Kosong yang diinginkan tunggu sampai selesai.
7.  Ambil Disket yang telah jadi tersebut untuk persiapan Instalasi Notebook
8.  Persiapkan Notebook yang akan diinstal, Pasang External DiskDrive
9.  Booting Notebook dg windows XP
10. Tunggu beberapa saat hingga layar biru muncul dan tekan F6 segera mungkin
11. Tunggu beberapa saat hingga muncul perintah untuk masukkan/load Driver yg diinginkan
-> tekan S -> Muncul pesan untuk masukkan Disket Driver yang akan di LOAD
-> Masukkan Disket Driver (poin 7) Tekan Enter
-> Tunggu beberapa saat hingga muncul beberapa Pilihan Driver yang akan diinstall
-> pilih Driver yg sesuai dgn tipe Notebook (contoh : SATA ICH8 AHCI mobile
u/Chipset Intel 965)
-> tekan enter
12. Lanjutkan proses instalasi seperti Biasa dan jangan Ambil Disket hingga RESTART

Notebook merk lain, bisa gunakan langkah-langkah sebagai panduan, tinggal disesuaikan dibagian instalasi driver SATA. (Joe)


III. pembuatan CD Windows XP + SATA


Sebelumnya siapkan lebih dahulu:
1. CD Master Windows XP
2. Dot Net Framework
3. nLite
4. Driver SATA

Langkah-langkah pembuatan Master Windows XP adalah:

1. Jalankan nLite. Tekan Next

2. Masukkan CD MasterXP >> pilih lokasi dimana Master Xp akan di copykan

3. Tekan Next

4. Pilih Driver dan Bootable ISO biar nanti bisa langsung di ‘burn’ di CD

//
//

5. Pilih Insert, cari Driver SATA >> pilih iaAHCI.inf di folder komputer kamu >> klik Next

6. Pilih Textmode driver, Block saja semua file yang muncul >> klik OK

7. Klik Next

Weleh masih panjang banget, mendingan baca aja tutorialnya yang sudah saya buat dalam bentuk Pdf saja ya?

donlode
Membuat CD Windows XP + SATA LINK1 | LINK2
nLITE 1.3 + Dot Net FrameWork
Driver SATA for AMD
Driver SATA for INTEL

Sumber artikel:

anugrahpratama.com blog

http://www.bujangrimbo.com

Sumber gambar:

http://aris85.files.wordpress.com